The Basic HA Cluster

While we have more detailed docs on setting up a High Availability (HA) cluster, this post will cover the simplest HA cluster you can create.
Baseline HA Cluster 💻🖥️💻
Whenever we get a question around HA, this is the cluster configuration I start with. It provides a solid foundation when deploying beyond a single server.
Our cluster will have:
- 4 nodes or VMs:
- 1 load balancer
- 3 servers
- A k3s-upgrade plan that will automatically update the cluster to the latest patch version of a given minor.
Cluster Setup 🌐🔧
I'm using vagrant to provision 4 Ubuntu 24.04 VMs for this setup, all on a flat network. Setup of nodes is left as an exercise for the reader 😅.
My nodes are configured with the following names and IPs:
| Name | IP |
|---|---|
| lb-0 | 10.10.10.100 |
| server-0 | 10.10.10.50 |
| server-1 | 10.10.10.51 |
| server-2 | 10.10.10.52 |
Load Balancer
I'm using haproxy as it supports later expansion to multiple LB nodes (via keepalived).
SSH into the load balancer and install haproxy:
sudo apt install haproxy
The haproxy config is simple, just forward traffic to the servers:
#/etc/haproxy/haproxy.cfg
frontend k3s
    bind *:6443
    mode tcp
    default_backend k3s

backend k3s
    mode tcp
    option tcp-check
    balance roundrobin
    server server-0 10.10.10.50:6443 check
    server server-1 10.10.10.51:6443 check
    server server-2 10.10.10.52:6443 check
Restart haproxy to apply the config:
systemctl restart haproxy
Install K3s on first server
On the first server, install K3s with embedded etcd and a known token:
curl -sfL https://get.k3s.io | INSTALL_K3S_CHANNEL=v1.31 sh -s - \
--cluster-init --token k3sblog --tls-san 10.10.10.100
We pass the --tls-san flag adds the load balancer IP as a Subject Alternative Name (SAN) for the certificate.
Join the other servers
On the other servers, join the cluster via the load balancer:
curl -sfL https://get.k3s.io | INSTALL_K3S_CHANNEL=v1.31 sh -s - \
--server https://10.10.10.100:6443 --token k3sblog
Grab the kubeconfig
Now that the cluster is up, we can grab the kubeconfig from the first server:
scp server-0:/etc/rancher/k3s/k3s.yaml k3s.yaml
Modify it to access the cluster via the load balancer:
sed -i 's/127.0.0.1/10.10.10.100/' k3s.yaml
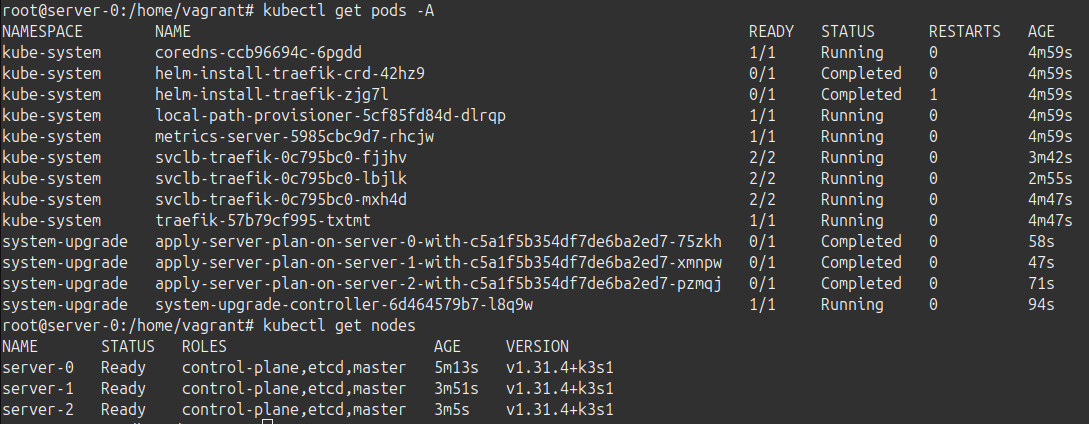
No we can manage the cluster from our local machine:
export KUBECONFIG=$(pwd)/k3s.yaml
kubectl get nodes
Upgrade Plan 🏗️📝📐
The plan I'm using will keep k3s updated to the latest patch version of the channel we give. In this case I'm using the v1.31 channel, the same channel used above. Kubernetes v1.31.4 just released at time of writing this post, so with this plan we have stable upgrades handled for the next 10-12 months (depending on how many patch releases this minor gets).
Install the system-upgrade-controller
The upgrade plan is managed by the system-upgrade-controller. Install it:
kubectl apply -f https://github.com/rancher/system-upgrade-controller/releases/latest/download/system-upgrade-controller.yaml
kubectl apply -f https://github.com/rancher/system-upgrade-controller/releases/latest/download/crd.yaml
Create the upgrade plan
#server-plan.yaml
apiVersion: upgrade.cattle.io/v1
kind: Plan
metadata:
  name: server-plan
  namespace: system-upgrade
spec:
  concurrency: 1
  cordon: true
  nodeSelector:
    matchExpressions:
    - key: node-role.kubernetes.io/control-plane
      operator: In
      values:
      - "true"
  serviceAccountName: system-upgrade
  upgrade:
    image: rancher/k3s-upgrade
  channel: https://update.k3s.io/v1-release/channels/v1.31
kubectl apply -f server-plan.yaml
See the automated upgrade docs for more details.
Conclusion 🚀
We now have a high-availability cluster, accessible via a single IP. Upgrades are handled for the next year. This is a great starting point to:
- Add agent nodes to expand our workload capacity
- Add another load-balancer for additional redundancy